Connect a client’s bank so transactions come in every day
A live bank feed connects to your client’s bank. Transactions come into Ezyiah every day, and Ezyiah reconciles them in the background.Every plan includes unlimited live bank feeds, so connect every account the client has.The connection is read-only. It runs through Fiskil, an accredited provider under Australia’s Consumer Data Right (CDR). Ezyiah never sees the bank password and can’t move money.
Connect a bank feed
1
Open Banks
After you add a client, Ezyiah opens their Banks page for you. For an existing client, open the client and click Banks.
2
Click Link Live Bank Feed
Steps 1 and 2: Banks, then Link Live Bank Feed
It’s in the top right of the Banks page. On a client with no banks yet, click Connect Live Bank Feeds instead. The Connect Bank Feed window opens.
3
Send the link to the account holder
Step 3: type the account holder's email, then click Send Email
Type the Email of the person who can sign in to the bank account, and click Send Email. Ezyiah emails them a secure link. The link expires in 15 minutes, so let them know it’s coming. If it runs out, send a new one.
4
They approve access with their bank
The account holder opens the link and follows the steps below. You don’t need to be there.
5
Check the accounts
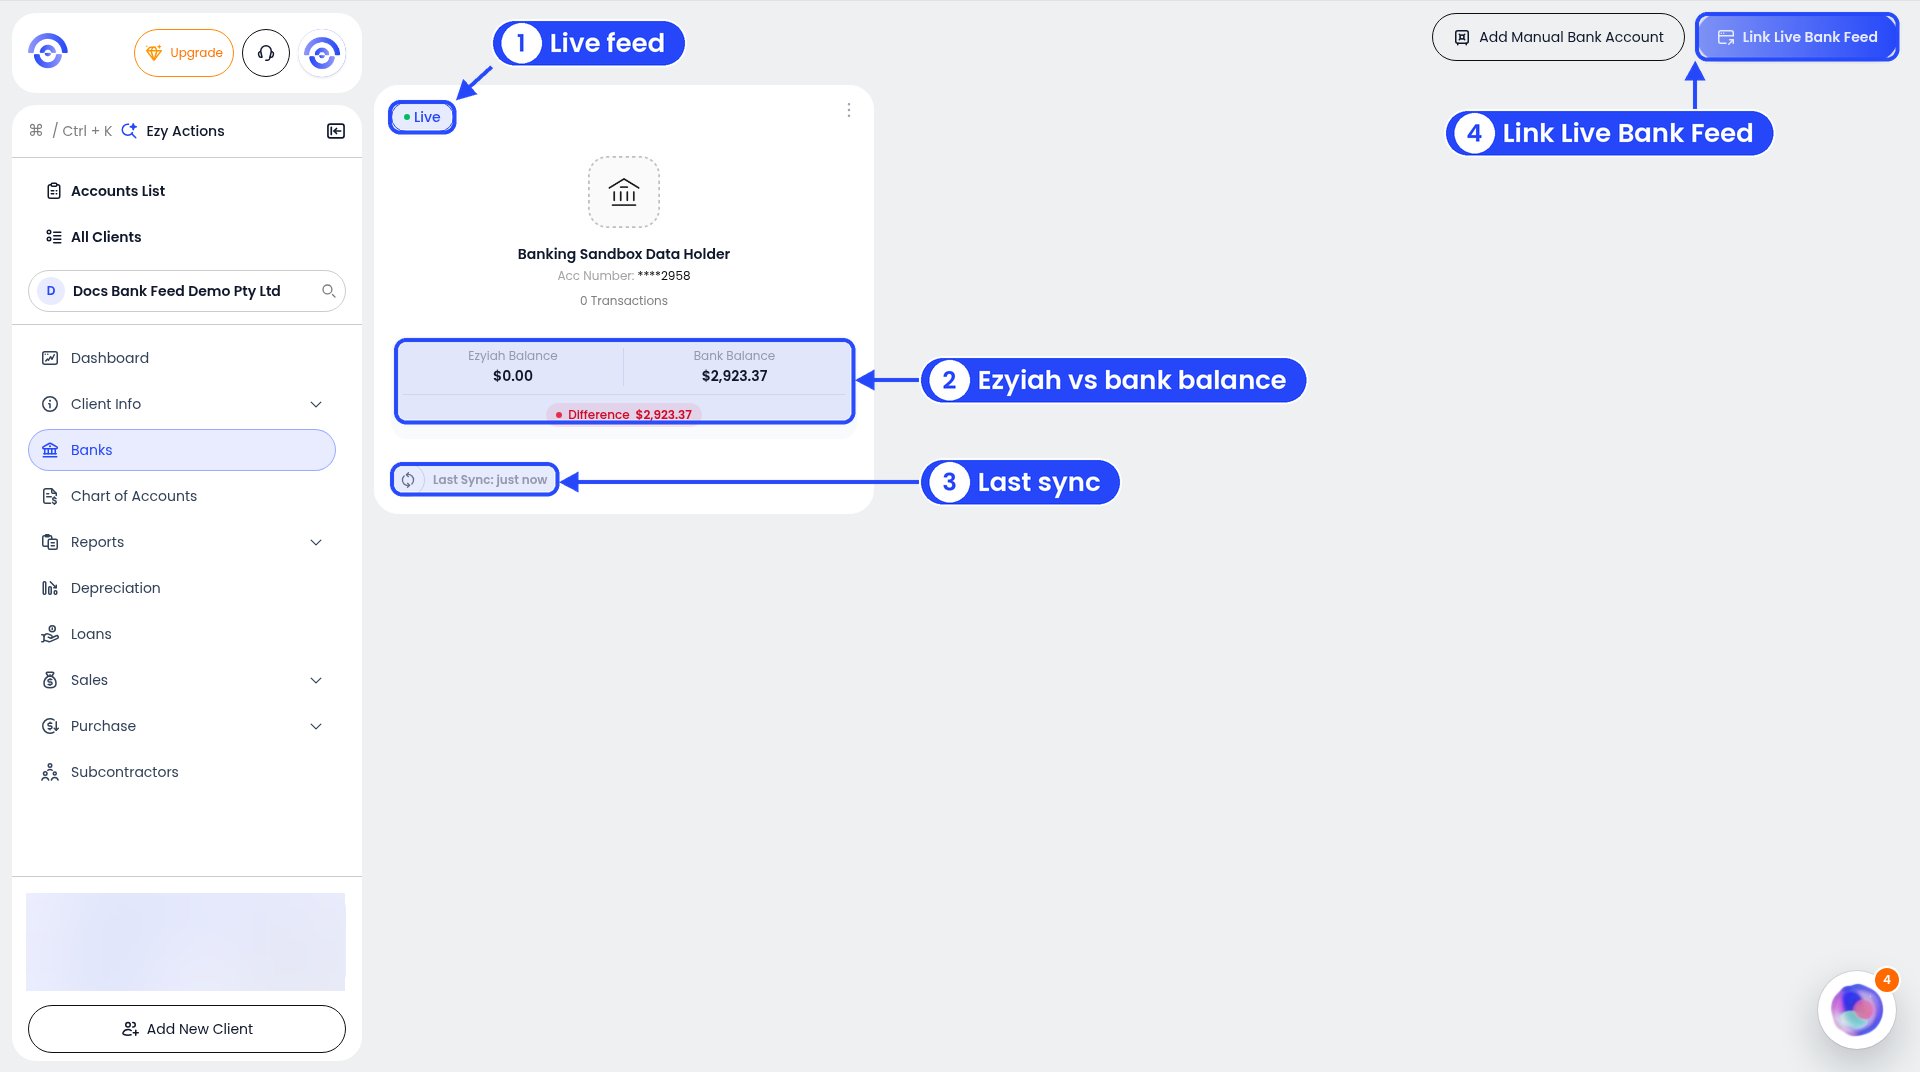
The connected account shows as Live on Banks
Once they approve, the account shows in Banks with a Live badge. You’ll see the account number, the number of transactions and when it last synced. You’ll also see Ezyiah’s balance next to the bank’s balance, so you can spot anything out of sync.
Is the account in the name of a company, trust or partnership? The bank may need a Nominated Representative first. See Live bank feeds by bank.
What the account holder sees
The link opens Fiskil, the service Ezyiah uses to connect to banks. Every bank’s screens look a little different, but the steps are the same.
1
Read what's shared
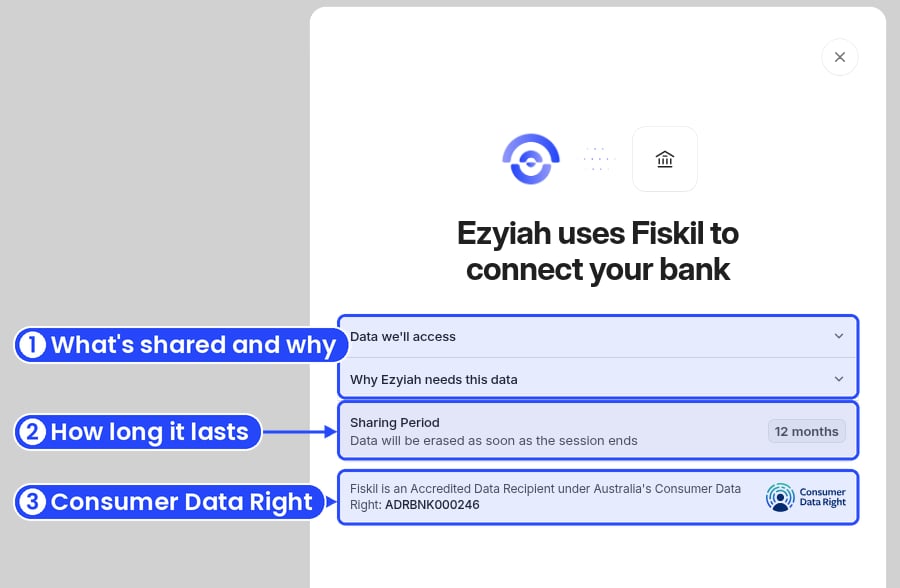
Step 1: Ezyiah connects through Fiskil
The first screen says “Ezyiah uses Fiskil to connect your bank”. It shows the data shared, why Ezyiah needs it, and how long sharing lasts.
2
Choose their bank
Step 2, an example bank search: type the bank's name, then click it
On Connect your bank, they type their bank’s name and click it in the results.
3
Sign in or verify with the bank
Step 3, an example: some banks send a one-time code
The bank’s own page opens. Depending on the bank, they sign in or enter a one-time code. This happens at the bank, not in Ezyiah.
4
Select accounts
Step 4, an example: each bank's page looks a little different
They tick each account to share, then continue.
5
Review and confirm
Step 5, an example: check what's shared, then click Confirm and share
They check what’s shared and click Confirm and share.
6
Access Approved
Step 6: Access Approved
Ezyiah shows Access Approved. They can close the page. The feed now shows as Live on your client’s Banks page.
Bring in older transactions
A new feed starts from today. To bring in history:
1
Open the account
In Banks, click the account card. The account’s page opens, with its transactions.
2
Click Fetch Previous Data
Step 2: Fetch Previous Data is in the top right of the account's page
It’s in the top right. The Fetch Previous Data window opens.
3
Pick how far back
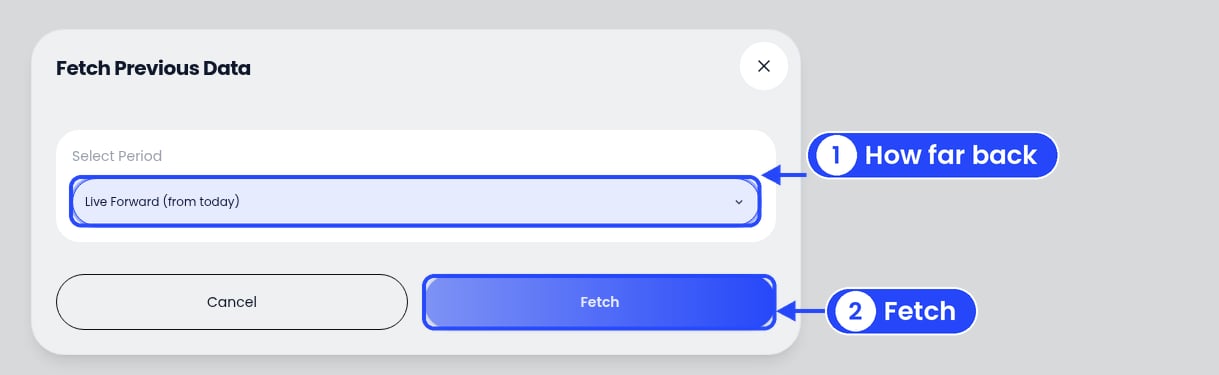
Step 3: pick how far back, then click Fetch
Open Select Period. It starts on Live Forward (from today). Choose 1 month back, 3 months back, 6 months back, 12 months back, 24 months back or Custom Date. Then click Fetch.
4
Let it run
Ezyiah brings in the transactions and starts reconciling. Watch it happen in the Ezyiah Assistant.
Fetched history counts toward your transactions. Fetch only as far back as you need.
What happens next
Ezyiah reconciles each new transaction and works out the GST. Anything it isn’t sure about is flagged for you to check. Review the work in the Chart of Accounts.
{"docsConfig":{"theme":"mint","$schema":"https://mintlify.com/docs.json","name":"Ezyiah","description":"Help docs for Ezyiah, AI accounting software built for the Australian market","colors":{"primary":"#2547F9","light":"#9298F9","dark":"#2547F9"},"logo":{"light":"https://mintcdn.com/ezyiah-3f16b61b/Ve47CujuGgN4pyqd/images/light.svg?fit=max\u0026auto=format\u0026n=Ve47CujuGgN4pyqd\u0026q=85\u0026s=a93f09364beedb00d71c1ee4b10f4954","dark":"https://mintcdn.com/ezyiah-3f16b61b/Ve47CujuGgN4pyqd/images/dark.svg?fit=max\u0026auto=format\u0026n=Ve47CujuGgN4pyqd\u0026q=85\u0026s=683424342d364154020a02a73e811824","href":"https://ezyiah.com.au"},"favicon":"https://mintcdn.com/ezyiah-3f16b61b/Ve47CujuGgN4pyqd/images/favicon.svg?fit=max\u0026auto=format\u0026n=Ve47CujuGgN4pyqd\u0026q=85\u0026s=11a9119ebc819180d54cd3d82ce71478","appearance":{"default":"light"},"background":{"color":{"light":"#F8F7F7","dark":"#000000"}},"navbar":{"links":[{"href":"https://ezyiah.com.au","label":"Main site"},{"href":"https://app.ezyiah.com.au/login","label":"Sign in"}],"primary":{"type":"button","label":"Get Started for Free","href":"https://app.ezyiah.com.au/signup"}},"footer":{"socials":{"linkedin":"https://www.linkedin.com/company/ezyiah","instagram":"https://www.instagram.com/ezyiah.com.au","youtube":"https://www.youtube.com/@EzyiahAI"}},"fonts":{"family":"Poppins"},"contextual":{"options":["copy","view","chatgpt","claude","perplexity","mcp","cursor","vscode"],"display":"header"},"styling":{"latex":true},"navigation":{"pages":[]}},"deployment":{"deploymentMetadataValue":{"subdomain":"ezyiah-3f16b61b","hasAudioNarration":false,"actualSubdomain":"ezyiah-3f16b61b","customDomains":["help.ezyiah.com.au"],"gitSource":{"type":"github","owner":"mintlify-community","repo":"docs-ezyiah-3f16b61b-bba5fbb8","deployBranch":"main","contentDirectory":"","isPrivate":true,"mountPath":"","label":""},"entitlements":{"AI_CHAT":{"status":"DISABLED"}},"buildId":"6b01a01dbee042a6adbe5f0d","clientVersion":"0.0.4270","searchFilterCounts":[{"language":"default","tag":"Banks \u0026 Reports","count":28},{"language":"default","tag":"Businesses","count":17},{"language":"default","tag":"Accountants","count":14},{"language":"default","tag":"Get Started","count":12},{"language":"default","tag":"Reports","count":9},{"language":"default","tag":"Getting started","count":8},{"language":"default","tag":"Clients","count":6},{"language":"default","tag":"Banks","count":6},{"language":"default","tag":"Your business","count":5},{"language":"default","tag":"Settings","count":4}]},"assistantConfig":{"enableAskAiButton":false,"enableStarterQuestions":false,"enableContextualStarterQuestions":false,"enableAskAiSearchBar":true,"deflection":{"enabled":true,"email":"support@ezyiah.com.au"}},"basePath":"","hasChatPermissions":false,"hasWebMcpPermissions":false,"toggles":[{"name":"kill-isr","enabled":true,"variant":{"name":"disabled","enabled":false,"feature_enabled":true},"impressionData":false},{"name":"custom-rbac-roles","enabled":true,"variant":{"name":"disabled","enabled":false,"feature_enabled":true},"impressionData":false},{"name":"agent-mintlify-slack","enabled":true,"variant":{"name":"disabled","enabled":false,"feature_enabled":true},"impressionData":false},{"name":"agent-integrations-settings","enabled":true,"variant":{"name":"disabled","enabled":false,"feature_enabled":true},"impressionData":false},{"name":"rbac-expansion","enabled":true,"variant":{"name":"disabled","enabled":false,"feature_enabled":true},"impressionData":false},{"name":"automations-pr-grouping","enabled":true,"variant":{"name":"disabled","enabled":false,"feature_enabled":true},"impressionData":false},{"name":"custom-prefix","enabled":true,"variant":{"name":"disabled","enabled":false,"feature_enabled":true},"impressionData":false},{"name":"analytics-v7","enabled":true,"variant":{"name":"disabled","enabled":false,"feature_enabled":true},"impressionData":false},{"name":"user-flows-analytics","enabled":true,"variant":{"name":"disabled","enabled":false,"feature_enabled":true},"impressionData":false},{"name":"no-publish-flow","enabled":true,"variant":{"name":"disabled","enabled":false,"feature_enabled":true},"impressionData":false},{"name":"workos-onboarding","enabled":true,"variant":{"name":"disabled","enabled":false,"feature_enabled":true},"impressionData":false},{"name":"snapshot-serving-live","enabled":true,"variant":{"name":"disabled","enabled":false,"feature_enabled":true},"impressionData":false},{"name":"stripTemperatureMiddleware","enabled":true,"variant":{"name":"disabled","enabled":false,"feature_enabled":true},"impressionData":false},{"name":"support-platform-pylon-zendesk","enabled":true,"variant":{"name":"disabled","enabled":false,"feature_enabled":true},"impressionData":false},{"name":"snapshot-serving","enabled":true,"variant":{"name":"disabled","enabled":false,"feature_enabled":true},"impressionData":false},{"name":"instant-rollback","enabled":true,"variant":{"name":"disabled","enabled":false,"feature_enabled":true},"impressionData":false},{"name":"granular-notifications-server","enabled":true,"variant":{"name":"disabled","enabled":false,"feature_enabled":true},"impressionData":false},{"name":"granular-notifications","enabled":true,"variant":{"name":"disabled","enabled":false,"feature_enabled":true},"impressionData":false},{"name":"automations-fable","enabled":true,"variant":{"name":"disabled","enabled":false,"feature_enabled":true},"impressionData":false},{"name":"fixed-ai-action-pricing","enabled":true,"variant":{"name":"disabled","enabled":false,"feature_enabled":true},"impressionData":false},{"name":"site-roles","enabled":true,"variant":{"name":"disabled","enabled":false,"feature_enabled":true},"impressionData":false},{"name":"automation-resolve-merge-conflict","enabled":true,"variant":{"name":"disabled","enabled":false,"feature_enabled":true},"impressionData":false},{"name":"scoped-publishing","enabled":true,"variant":{"name":"disabled","enabled":false,"feature_enabled":true},"impressionData":false},{"name":"mintql","enabled":true,"variant":{"name":"disabled","enabled":false,"feature_enabled":true},"impressionData":false},{"name":"page-level-analytics","enabled":true,"variant":{"name":"disabled","enabled":false,"feature_enabled":true},"impressionData":false},{"name":"editor-version-history-v2","enabled":true,"variant":{"name":"disabled","enabled":false,"feature_enabled":true},"impressionData":false},{"name":"billing-page-v2","enabled":true,"variant":{"name":"disabled","enabled":false,"feature_enabled":true},"impressionData":false},{"name":"full-page-search","enabled":true,"variant":{"name":"disabled","enabled":false,"feature_enabled":true},"impressionData":false},{"name":"workspace-projects","enabled":true,"variant":{"name":"disabled","enabled":false,"feature_enabled":true},"impressionData":false},{"name":"assistant-v5","enabled":true,"variant":{"name":"disabled","enabled":false,"feature_enabled":true},"impressionData":false},{"name":"fork-pr-previews","enabled":true,"variant":{"name":"disabled","enabled":false,"feature_enabled":true},"impressionData":false},{"name":"revalidation-jwt","enabled":true,"variant":{"name":"disabled","enabled":false,"feature_enabled":true},"impressionData":false},{"name":"workos-sso-scim","enabled":true,"variant":{"name":"disabled","enabled":false,"feature_enabled":true},"impressionData":false},{"name":"hobby-abuse-scan","enabled":true,"variant":{"name":"disabled","enabled":false,"feature_enabled":true},"impressionData":false},{"name":"dashboard-inbox","enabled":true,"variant":{"name":"disabled","enabled":false,"feature_enabled":true},"impressionData":false},{"name":"workos-signup","enabled":true,"variant":{"name":"disabled","enabled":false,"feature_enabled":true},"impressionData":false},{"name":"turbopuffer-dual-write","enabled":true,"variant":{"name":"disabled","enabled":false,"feature_enabled":true},"impressionData":false},{"name":"workos-enabled","enabled":true,"variant":{"name":"disabled","enabled":false,"feature_enabled":true},"impressionData":false},{"name":"approve-review-flow","enabled":true,"variant":{"name":"disabled","enabled":false,"feature_enabled":true},"impressionData":false},{"name":"editor-metadata","enabled":true,"variant":{"name":"disabled","enabled":false,"feature_enabled":true},"impressionData":false},{"name":"sso-setup-deadline-banner","enabled":true,"variant":{"name":"disabled","enabled":false,"feature_enabled":true},"impressionData":false},{"name":"turbopuffer-serve","enabled":true,"variant":{"name":"disabled","enabled":false,"feature_enabled":true},"impressionData":false},{"name":"live-agents","enabled":true,"variant":{"name":"disabled","enabled":false,"feature_enabled":true},"impressionData":false},{"name":"starter-pricing","enabled":true,"variant":{"name":"treatment","enabled":true,"payload":{"type":"string","value":"treatment"},"feature_enabled":true},"impressionData":false},{"name":"llms-txt-v2","enabled":true,"variant":{"name":"disabled","enabled":false,"feature_enabled":true},"impressionData":false},{"name":"wildcard-email-auth","enabled":true,"variant":{"name":"disabled","enabled":false,"feature_enabled":true},"impressionData":false}],"googleFontsInlined":true},"customCss":[]}
{"page":{"pagePath":"features/banks/adding-live-bank-feeds","slug":"/features/banks/adding-live-bank-feeds","pageMetadata":{"title":"Live bank feeds","description":"Connect a client's bank so transactions come in every day","href":"/features/banks/adding-live-bank-feeds"},"description":{"compiledSource":"\"use strict\";\nconst {jsx: _jsx} = arguments[0];\nconst {useMDXComponents: _provideComponents} = arguments[0];\nfunction _createMdxContent(props) {\n const _components = {\n p: \"p\",\n ..._provideComponents(),\n ...props.components\n };\n return _jsx(_components.p, {\n children: \"Connect a client’s bank so transactions come in every day\"\n });\n}\nfunction MDXContent(props = {}) {\n const {wrapper: MDXLayout} = {\n ..._provideComponents(),\n ...props.components\n };\n return MDXLayout ? _jsx(MDXLayout, {\n ...props,\n children: _jsx(_createMdxContent, {\n ...props\n })\n }) : _createMdxContent(props);\n}\nreturn {\n default: MDXContent\n};\n","frontmatter":{},"scope":{}},"pageType":"default","mdx":{"mdxSource":{"compiledSource":"\"use strict\";const{Fragment:_Fragment,jsx:_jsx,jsxs:_jsxs}=arguments[0];const{useMDXComponents:_provideComponents}=arguments[0];function _createMdxContent(props){const _components={a:`a`,p:`p`,strong:`strong`,..._provideComponents(),...props.components},{Frame,Heading,Note,OptimizedImage,Step,Steps,Tip}=_components;if(!Frame)_missingMdxReference(`Frame`,true);if(!Heading)_missingMdxReference(`Heading`,true);if(!Note)_missingMdxReference(`Note`,true);if(!OptimizedImage)_missingMdxReference(`OptimizedImage`,true);if(!Step)_missingMdxReference(`Step`,true);if(!Steps)_missingMdxReference(`Steps`,true);if(!Tip)_missingMdxReference(`Tip`,true);return _jsxs(_Fragment,{children:[_jsx(_components.p,{children:`A live bank feed connects to your client’s bank. Transactions come into Ezyiah every day, and Ezyiah reconciles them in the background.`}),`\n`,_jsxs(_components.p,{children:[`Every plan includes `,_jsx(_components.strong,{children:`unlimited live bank feeds`}),`, so connect every account the client has.`]}),`\n`,_jsxs(_components.p,{children:[`The connection is `,_jsx(_components.strong,{children:`read-only`}),`. It runs through Fiskil, an accredited provider under Australia’s Consumer Data Right (CDR). Ezyiah never sees the bank password and can’t move money.`]}),`\n`,_jsx(Heading,{level:`2`,id:`connect-a-bank-feed`,children:`Connect a bank feed`}),`\n`,_jsxs(Steps,{children:[_jsx(Step,{title:`Open Banks`,children:_jsxs(_components.p,{children:[`After you add a client, Ezyiah opens their `,_jsx(_components.strong,{children:`Banks`}),` page for you. For an existing client, open the client and click `,_jsx(_components.strong,{children:`Banks`}),`.`]})}),_jsxs(Step,{title:`Click Link Live Bank Feed`,children:[_jsx(Frame,{caption:`Steps 1 and 2: Banks, then Link Live Bank Feed`,children:_jsx(OptimizedImage,{src:`https://mintcdn.com/ezyiah-3f16b61b/lUeajoy-xcTLiMi2/images/annotated/accountant/a-bank-1.png?fit=max\u0026auto=format\u0026n=lUeajoy-xcTLiMi2\u0026q=85\u0026s=2ae4dafbe9217bcb5056826b79f4a11d`,alt:`The Banks page with numbered callouts on Banks in the sidebar, Add Manual Bank Account, Link Live Bank Feed and a bank account card with a Manual badge. The account name is blurred`,\"data-og-width\":`1280`,width:`1280`,\"data-og-height\":`718`,height:`718`,\"data-path\":`images/annotated/accountant/a-bank-1.png`,\"data-optimize\":`true`,\"data-opv\":`3`,srcset:`https://mintcdn.com/ezyiah-3f16b61b/lUeajoy-xcTLiMi2/images/annotated/accountant/a-bank-1.png?w=280\u0026fit=max\u0026auto=format\u0026n=lUeajoy-xcTLiMi2\u0026q=85\u0026s=d753734340511aab1f5b94708e1ad8e7 280w, https://mintcdn.com/ezyiah-3f16b61b/lUeajoy-xcTLiMi2/images/annotated/accountant/a-bank-1.png?w=560\u0026fit=max\u0026auto=format\u0026n=lUeajoy-xcTLiMi2\u0026q=85\u0026s=e5f6d04eb7c3109059d3849222d292dc 560w, https://mintcdn.com/ezyiah-3f16b61b/lUeajoy-xcTLiMi2/images/annotated/accountant/a-bank-1.png?w=840\u0026fit=max\u0026auto=format\u0026n=lUeajoy-xcTLiMi2\u0026q=85\u0026s=1908f9cfda8048e1c15d7230c5bd1256 840w, https://mintcdn.com/ezyiah-3f16b61b/lUeajoy-xcTLiMi2/images/annotated/accountant/a-bank-1.png?w=1100\u0026fit=max\u0026auto=format\u0026n=lUeajoy-xcTLiMi2\u0026q=85\u0026s=62fcd9f1d9172301de93566b68272259 1100w, https://mintcdn.com/ezyiah-3f16b61b/lUeajoy-xcTLiMi2/images/annotated/accountant/a-bank-1.png?w=1650\u0026fit=max\u0026auto=format\u0026n=lUeajoy-xcTLiMi2\u0026q=85\u0026s=1f55257a0951470662626049e53bb79f 1650w, https://mintcdn.com/ezyiah-3f16b61b/lUeajoy-xcTLiMi2/images/annotated/accountant/a-bank-1.png?w=2500\u0026fit=max\u0026auto=format\u0026n=lUeajoy-xcTLiMi2\u0026q=85\u0026s=4dacb56a4385ec140e6d87c43dad9545 2500w`})}),_jsxs(_components.p,{children:[`It’s in the top right of the `,_jsx(_components.strong,{children:`Banks`}),` page. On a client with no banks yet, click `,_jsx(_components.strong,{children:`Connect Live Bank Feeds`}),` instead. The `,_jsx(_components.strong,{children:`Connect Bank Feed`}),` window opens.`]})]}),_jsxs(Step,{title:`Send the link to the account holder`,children:[_jsx(Frame,{caption:`Step 3: type the account holder's email, then click Send Email`,children:_jsx(OptimizedImage,{src:`https://mintcdn.com/ezyiah-3f16b61b/mEqdHLyQPbZI3Zxy/images/annotated/banks/lbf-connect-1.png?fit=max\u0026auto=format\u0026n=mEqdHLyQPbZI3Zxy\u0026q=85\u0026s=7870ed944644848a2b85237d88310178`,alt:`The Connect Bank Feed window with callouts on the Email field (blurred), the note about the secure link, and Send Email`,\"data-og-width\":`1432`,width:`1432`,\"data-og-height\":`450`,height:`450`,\"data-path\":`images/annotated/banks/lbf-connect-1.png`,\"data-optimize\":`true`,\"data-opv\":`3`,srcset:`https://mintcdn.com/ezyiah-3f16b61b/mEqdHLyQPbZI3Zxy/images/annotated/banks/lbf-connect-1.png?w=280\u0026fit=max\u0026auto=format\u0026n=mEqdHLyQPbZI3Zxy\u0026q=85\u0026s=dd9965a752c20f5c3e4e45f489f0e78f 280w, https://mintcdn.com/ezyiah-3f16b61b/mEqdHLyQPbZI3Zxy/images/annotated/banks/lbf-connect-1.png?w=560\u0026fit=max\u0026auto=format\u0026n=mEqdHLyQPbZI3Zxy\u0026q=85\u0026s=6e29d30a02d9fbb9aebd02d424390601 560w, https://mintcdn.com/ezyiah-3f16b61b/mEqdHLyQPbZI3Zxy/images/annotated/banks/lbf-connect-1.png?w=840\u0026fit=max\u0026auto=format\u0026n=mEqdHLyQPbZI3Zxy\u0026q=85\u0026s=4352fe5ebd35f55291301b1ecbd52527 840w, https://mintcdn.com/ezyiah-3f16b61b/mEqdHLyQPbZI3Zxy/images/annotated/banks/lbf-connect-1.png?w=1100\u0026fit=max\u0026auto=format\u0026n=mEqdHLyQPbZI3Zxy\u0026q=85\u0026s=6fffb6b825b9b9c338192d4ff2bb48e3 1100w, https://mintcdn.com/ezyiah-3f16b61b/mEqdHLyQPbZI3Zxy/images/annotated/banks/lbf-connect-1.png?w=1650\u0026fit=max\u0026auto=format\u0026n=mEqdHLyQPbZI3Zxy\u0026q=85\u0026s=fe2fe56e6aa71d53ef40b890c5230a9f 1650w, https://mintcdn.com/ezyiah-3f16b61b/mEqdHLyQPbZI3Zxy/images/annotated/banks/lbf-connect-1.png?w=2500\u0026fit=max\u0026auto=format\u0026n=mEqdHLyQPbZI3Zxy\u0026q=85\u0026s=58b9269291fca7c441af1d2270224b3e 2500w`})}),_jsxs(_components.p,{children:[`Type the `,_jsx(_components.strong,{children:`Email`}),` of the person who can sign in to the bank account, and click `,_jsx(_components.strong,{children:`Send Email`}),`. Ezyiah emails them a secure link. The link expires in `,_jsx(_components.strong,{children:`15 minutes`}),`, so let them know it’s coming. If it runs out, send a new one.`]})]}),_jsx(Step,{title:`They approve access with their bank`,children:_jsx(_components.p,{children:`The account holder opens the link and follows the steps below. You don’t need to be there.`})}),_jsxs(Step,{title:`Check the accounts`,children:[_jsx(Frame,{caption:`The connected account shows as Live on Banks`,children:_jsx(OptimizedImage,{src:`https://mintcdn.com/ezyiah-3f16b61b/mEqdHLyQPbZI3Zxy/images/annotated/banks/lbf-live-1.png?fit=max\u0026auto=format\u0026n=mEqdHLyQPbZI3Zxy\u0026q=85\u0026s=84ed8f45d9554300621cc4c54a1eb94c`,alt:`The Banks page with a Live bank card, with callouts on the Live badge, the Ezyiah and bank balances, Last Sync and Link Live Bank Feed`,\"data-og-width\":`1920`,width:`1920`,\"data-og-height\":`1072`,height:`1072`,\"data-path\":`images/annotated/banks/lbf-live-1.png`,\"data-optimize\":`true`,\"data-opv\":`3`,srcset:`https://mintcdn.com/ezyiah-3f16b61b/mEqdHLyQPbZI3Zxy/images/annotated/banks/lbf-live-1.png?w=280\u0026fit=max\u0026auto=format\u0026n=mEqdHLyQPbZI3Zxy\u0026q=85\u0026s=9cade78b28606ee210d7a086d8bde872 280w, https://mintcdn.com/ezyiah-3f16b61b/mEqdHLyQPbZI3Zxy/images/annotated/banks/lbf-live-1.png?w=560\u0026fit=max\u0026auto=format\u0026n=mEqdHLyQPbZI3Zxy\u0026q=85\u0026s=4a7a6974f502054fb7a77e2828791410 560w, https://mintcdn.com/ezyiah-3f16b61b/mEqdHLyQPbZI3Zxy/images/annotated/banks/lbf-live-1.png?w=840\u0026fit=max\u0026auto=format\u0026n=mEqdHLyQPbZI3Zxy\u0026q=85\u0026s=9f45a3b091c17c870753253349997a14 840w, https://mintcdn.com/ezyiah-3f16b61b/mEqdHLyQPbZI3Zxy/images/annotated/banks/lbf-live-1.png?w=1100\u0026fit=max\u0026auto=format\u0026n=mEqdHLyQPbZI3Zxy\u0026q=85\u0026s=dfa51ebf6fac693dc5c41c55dba0a954 1100w, https://mintcdn.com/ezyiah-3f16b61b/mEqdHLyQPbZI3Zxy/images/annotated/banks/lbf-live-1.png?w=1650\u0026fit=max\u0026auto=format\u0026n=mEqdHLyQPbZI3Zxy\u0026q=85\u0026s=bd18201ee0c35261ddccc3cfc08a088b 1650w, https://mintcdn.com/ezyiah-3f16b61b/mEqdHLyQPbZI3Zxy/images/annotated/banks/lbf-live-1.png?w=2500\u0026fit=max\u0026auto=format\u0026n=mEqdHLyQPbZI3Zxy\u0026q=85\u0026s=5009b0fd680956731636a99bfcbde530 2500w`})}),_jsxs(_components.p,{children:[`Once they approve, the account shows in `,_jsx(_components.strong,{children:`Banks`}),` with a `,_jsx(_components.strong,{children:`Live`}),` badge. You’ll see the account number, the number of transactions and when it last synced. You’ll also see Ezyiah’s balance next to the bank’s balance, so you can spot anything out of sync.`]})]})]}),`\n`,_jsx(Note,{children:_jsxs(_components.p,{children:[`Is the account in the name of a company, trust or partnership? The bank may need a `,_jsx(_components.strong,{children:`Nominated Representative`}),` first. See `,_jsx(_components.a,{href:`/features/banks/setting-up-live-bank-feeds-for-business-accounts`,children:`Live bank feeds by bank`}),`.`]})}),`\n`,_jsx(Heading,{level:`2`,id:`what-the-account-holder-sees`,children:`What the account holder sees`}),`\n`,_jsx(_components.p,{children:`The link opens Fiskil, the service Ezyiah uses to connect to banks. Every bank’s screens look a little different, but the steps are the same.`}),`\n`,_jsxs(Steps,{children:[_jsxs(Step,{title:`Read what's shared`,children:[_jsx(Frame,{caption:`Step 1: Ezyiah connects through Fiskil`,children:_jsx(OptimizedImage,{src:`https://mintcdn.com/ezyiah-3f16b61b/mEqdHLyQPbZI3Zxy/images/annotated/banks/lbf-fiskil-1.png?fit=max\u0026auto=format\u0026n=mEqdHLyQPbZI3Zxy\u0026q=85\u0026s=475272b92130e6072e4db179691d783b`,alt:`The Fiskil screen 'Ezyiah uses Fiskil to connect your bank', with callouts on what's shared and why, the sharing period and the Consumer Data Right note`,\"data-og-width\":`900`,width:`900`,\"data-og-height\":`588`,height:`588`,\"data-path\":`images/annotated/banks/lbf-fiskil-1.png`,\"data-optimize\":`true`,\"data-opv\":`3`,srcset:`https://mintcdn.com/ezyiah-3f16b61b/mEqdHLyQPbZI3Zxy/images/annotated/banks/lbf-fiskil-1.png?w=280\u0026fit=max\u0026auto=format\u0026n=mEqdHLyQPbZI3Zxy\u0026q=85\u0026s=1fe9761f53b271dcc8de3ec142a8f59c 280w, https://mintcdn.com/ezyiah-3f16b61b/mEqdHLyQPbZI3Zxy/images/annotated/banks/lbf-fiskil-1.png?w=560\u0026fit=max\u0026auto=format\u0026n=mEqdHLyQPbZI3Zxy\u0026q=85\u0026s=83a48ab2a3f13c8da7767effda6279f6 560w, https://mintcdn.com/ezyiah-3f16b61b/mEqdHLyQPbZI3Zxy/images/annotated/banks/lbf-fiskil-1.png?w=840\u0026fit=max\u0026auto=format\u0026n=mEqdHLyQPbZI3Zxy\u0026q=85\u0026s=acb566fa3176159628aae6472e249a93 840w, https://mintcdn.com/ezyiah-3f16b61b/mEqdHLyQPbZI3Zxy/images/annotated/banks/lbf-fiskil-1.png?w=1100\u0026fit=max\u0026auto=format\u0026n=mEqdHLyQPbZI3Zxy\u0026q=85\u0026s=27b39d1bb5a28c8dc973772870d54161 1100w, https://mintcdn.com/ezyiah-3f16b61b/mEqdHLyQPbZI3Zxy/images/annotated/banks/lbf-fiskil-1.png?w=1650\u0026fit=max\u0026auto=format\u0026n=mEqdHLyQPbZI3Zxy\u0026q=85\u0026s=c92cbadac3cf76cceb9a6c256df15f49 1650w, https://mintcdn.com/ezyiah-3f16b61b/mEqdHLyQPbZI3Zxy/images/annotated/banks/lbf-fiskil-1.png?w=2500\u0026fit=max\u0026auto=format\u0026n=mEqdHLyQPbZI3Zxy\u0026q=85\u0026s=213250360d981223d7416675e8e8d3a7 2500w`})}),_jsx(_components.p,{children:`The first screen says “Ezyiah uses Fiskil to connect your bank”. It shows the data shared, why Ezyiah needs it, and how long sharing lasts.`})]}),_jsxs(Step,{title:`Choose their bank`,children:[_jsx(Frame,{caption:`Step 2, an example bank search: type the bank's name, then click it`,children:_jsx(OptimizedImage,{src:`https://mintcdn.com/ezyiah-3f16b61b/mEqdHLyQPbZI3Zxy/images/annotated/banks/lbf-bank-search-1.png?fit=max\u0026auto=format\u0026n=mEqdHLyQPbZI3Zxy\u0026q=85\u0026s=45672e88472436ef8c7a85e168a6c067`,alt:`An example Connect your bank screen with callouts on the search box and the matching bank. The search text and bank name are blurred`,\"data-og-width\":`960`,width:`960`,\"data-og-height\":`338`,height:`338`,\"data-path\":`images/annotated/banks/lbf-bank-search-1.png`,\"data-optimize\":`true`,\"data-opv\":`3`,srcset:`https://mintcdn.com/ezyiah-3f16b61b/mEqdHLyQPbZI3Zxy/images/annotated/banks/lbf-bank-search-1.png?w=280\u0026fit=max\u0026auto=format\u0026n=mEqdHLyQPbZI3Zxy\u0026q=85\u0026s=93f038ee67790b415dfc5547ee6c34c5 280w, https://mintcdn.com/ezyiah-3f16b61b/mEqdHLyQPbZI3Zxy/images/annotated/banks/lbf-bank-search-1.png?w=560\u0026fit=max\u0026auto=format\u0026n=mEqdHLyQPbZI3Zxy\u0026q=85\u0026s=f3e6010daa95a7da19891ecf0587bb2d 560w, https://mintcdn.com/ezyiah-3f16b61b/mEqdHLyQPbZI3Zxy/images/annotated/banks/lbf-bank-search-1.png?w=840\u0026fit=max\u0026auto=format\u0026n=mEqdHLyQPbZI3Zxy\u0026q=85\u0026s=04b445bf889777e672c028a129e258b4 840w, https://mintcdn.com/ezyiah-3f16b61b/mEqdHLyQPbZI3Zxy/images/annotated/banks/lbf-bank-search-1.png?w=1100\u0026fit=max\u0026auto=format\u0026n=mEqdHLyQPbZI3Zxy\u0026q=85\u0026s=664a7bf09e44f53ac8982e0f870e756d 1100w, https://mintcdn.com/ezyiah-3f16b61b/mEqdHLyQPbZI3Zxy/images/annotated/banks/lbf-bank-search-1.png?w=1650\u0026fit=max\u0026auto=format\u0026n=mEqdHLyQPbZI3Zxy\u0026q=85\u0026s=bf825830f6e26869ecbcbe45d07d2710 1650w, https://mintcdn.com/ezyiah-3f16b61b/mEqdHLyQPbZI3Zxy/images/annotated/banks/lbf-bank-search-1.png?w=2500\u0026fit=max\u0026auto=format\u0026n=mEqdHLyQPbZI3Zxy\u0026q=85\u0026s=0df7f5e8d1e1ac08ffbd22e6c89c1b85 2500w`})}),_jsxs(_components.p,{children:[`On `,_jsx(_components.strong,{children:`Connect your bank`}),`, they type their bank’s name and click it in the results.`]})]}),_jsxs(Step,{title:`Sign in or verify with the bank`,children:[_jsx(Frame,{caption:`Step 3, an example: some banks send a one-time code`,children:_jsx(OptimizedImage,{src:`https://mintcdn.com/ezyiah-3f16b61b/mEqdHLyQPbZI3Zxy/images/annotated/banks/lbf-otp-1.png?fit=max\u0026auto=format\u0026n=mEqdHLyQPbZI3Zxy\u0026q=85\u0026s=4dcd5f02915b0723d385baa7d1a3a513`,alt:`An example bank page titled Enter your code, with six code boxes and callouts on the code boxes and Continue. The email address is blurred`,\"data-og-width\":`825`,width:`825`,\"data-og-height\":`306`,height:`306`,\"data-path\":`images/annotated/banks/lbf-otp-1.png`,\"data-optimize\":`true`,\"data-opv\":`3`,srcset:`https://mintcdn.com/ezyiah-3f16b61b/mEqdHLyQPbZI3Zxy/images/annotated/banks/lbf-otp-1.png?w=280\u0026fit=max\u0026auto=format\u0026n=mEqdHLyQPbZI3Zxy\u0026q=85\u0026s=99e310900e6b0d5d66dec0315db61071 280w, https://mintcdn.com/ezyiah-3f16b61b/mEqdHLyQPbZI3Zxy/images/annotated/banks/lbf-otp-1.png?w=560\u0026fit=max\u0026auto=format\u0026n=mEqdHLyQPbZI3Zxy\u0026q=85\u0026s=14cb3617af1325333335f24b0951c00d 560w, https://mintcdn.com/ezyiah-3f16b61b/mEqdHLyQPbZI3Zxy/images/annotated/banks/lbf-otp-1.png?w=840\u0026fit=max\u0026auto=format\u0026n=mEqdHLyQPbZI3Zxy\u0026q=85\u0026s=843367f500371a5f5dcee59ef3b7b6e1 840w, https://mintcdn.com/ezyiah-3f16b61b/mEqdHLyQPbZI3Zxy/images/annotated/banks/lbf-otp-1.png?w=1100\u0026fit=max\u0026auto=format\u0026n=mEqdHLyQPbZI3Zxy\u0026q=85\u0026s=3464fddd672a2549a69784566d1cbcae 1100w, https://mintcdn.com/ezyiah-3f16b61b/mEqdHLyQPbZI3Zxy/images/annotated/banks/lbf-otp-1.png?w=1650\u0026fit=max\u0026auto=format\u0026n=mEqdHLyQPbZI3Zxy\u0026q=85\u0026s=a7122a9bd75a2846221aae59c5922384 1650w, https://mintcdn.com/ezyiah-3f16b61b/mEqdHLyQPbZI3Zxy/images/annotated/banks/lbf-otp-1.png?w=2500\u0026fit=max\u0026auto=format\u0026n=mEqdHLyQPbZI3Zxy\u0026q=85\u0026s=25dc3b40794056f3bc96197cc115ae1d 2500w`})}),_jsx(_components.p,{children:`The bank’s own page opens. Depending on the bank, they sign in or enter a one-time code. This happens at the bank, not in Ezyiah.`})]}),_jsxs(Step,{title:`Select accounts`,children:[_jsx(Frame,{caption:`Step 4, an example: each bank's page looks a little different`,children:_jsx(OptimizedImage,{src:`https://mintcdn.com/ezyiah-3f16b61b/mEqdHLyQPbZI3Zxy/images/annotated/banks/lbf-bank-accounts-1.png?fit=max\u0026auto=format\u0026n=mEqdHLyQPbZI3Zxy\u0026q=85\u0026s=3f72c6cce754375e7cefa127d344ad6e`,alt:`An example Select accounts page at a bank with one account ticked, with callouts on the ticked account and Continue`,\"data-og-width\":`1181`,width:`1181`,\"data-og-height\":`945`,height:`945`,\"data-path\":`images/annotated/banks/lbf-bank-accounts-1.png`,\"data-optimize\":`true`,\"data-opv\":`3`,srcset:`https://mintcdn.com/ezyiah-3f16b61b/mEqdHLyQPbZI3Zxy/images/annotated/banks/lbf-bank-accounts-1.png?w=280\u0026fit=max\u0026auto=format\u0026n=mEqdHLyQPbZI3Zxy\u0026q=85\u0026s=63c401be2973daba32c1b80f2b83d115 280w, https://mintcdn.com/ezyiah-3f16b61b/mEqdHLyQPbZI3Zxy/images/annotated/banks/lbf-bank-accounts-1.png?w=560\u0026fit=max\u0026auto=format\u0026n=mEqdHLyQPbZI3Zxy\u0026q=85\u0026s=5bcb72b132fc18040c2ebaae4a543b2b 560w, https://mintcdn.com/ezyiah-3f16b61b/mEqdHLyQPbZI3Zxy/images/annotated/banks/lbf-bank-accounts-1.png?w=840\u0026fit=max\u0026auto=format\u0026n=mEqdHLyQPbZI3Zxy\u0026q=85\u0026s=f02057935a619736a9d2b6e045077ca5 840w, https://mintcdn.com/ezyiah-3f16b61b/mEqdHLyQPbZI3Zxy/images/annotated/banks/lbf-bank-accounts-1.png?w=1100\u0026fit=max\u0026auto=format\u0026n=mEqdHLyQPbZI3Zxy\u0026q=85\u0026s=01542d7a890ae194f140821dcdb7701a 1100w, https://mintcdn.com/ezyiah-3f16b61b/mEqdHLyQPbZI3Zxy/images/annotated/banks/lbf-bank-accounts-1.png?w=1650\u0026fit=max\u0026auto=format\u0026n=mEqdHLyQPbZI3Zxy\u0026q=85\u0026s=4eb17c71a152457dee8751802180867b 1650w, https://mintcdn.com/ezyiah-3f16b61b/mEqdHLyQPbZI3Zxy/images/annotated/banks/lbf-bank-accounts-1.png?w=2500\u0026fit=max\u0026auto=format\u0026n=mEqdHLyQPbZI3Zxy\u0026q=85\u0026s=301792d1b45dcf660af73f5c5b04d35a 2500w`})}),_jsx(_components.p,{children:`They tick each account to share, then continue.`})]}),_jsxs(Step,{title:`Review and confirm`,children:[_jsx(Frame,{caption:`Step 5, an example: check what's shared, then click Confirm and share`,children:_jsx(OptimizedImage,{src:`https://mintcdn.com/ezyiah-3f16b61b/mEqdHLyQPbZI3Zxy/images/annotated/banks/lbf-bank-confirm-1.png?fit=max\u0026auto=format\u0026n=mEqdHLyQPbZI3Zxy\u0026q=85\u0026s=7cacea8582af21f9b2adb47ab3fec0a2`,alt:`An example Review and confirm page listing what will be shared, with callouts on the list and Confirm and share`,\"data-og-width\":`1200`,width:`1200`,\"data-og-height\":`694`,height:`694`,\"data-path\":`images/annotated/banks/lbf-bank-confirm-1.png`,\"data-optimize\":`true`,\"data-opv\":`3`,srcset:`https://mintcdn.com/ezyiah-3f16b61b/mEqdHLyQPbZI3Zxy/images/annotated/banks/lbf-bank-confirm-1.png?w=280\u0026fit=max\u0026auto=format\u0026n=mEqdHLyQPbZI3Zxy\u0026q=85\u0026s=361c1f808d4bc97c1e778f12e6587ce3 280w, https://mintcdn.com/ezyiah-3f16b61b/mEqdHLyQPbZI3Zxy/images/annotated/banks/lbf-bank-confirm-1.png?w=560\u0026fit=max\u0026auto=format\u0026n=mEqdHLyQPbZI3Zxy\u0026q=85\u0026s=4a90b1f8b5a3ef919e615b3fb3ec8fd8 560w, https://mintcdn.com/ezyiah-3f16b61b/mEqdHLyQPbZI3Zxy/images/annotated/banks/lbf-bank-confirm-1.png?w=840\u0026fit=max\u0026auto=format\u0026n=mEqdHLyQPbZI3Zxy\u0026q=85\u0026s=ff535bad9e8f44a647dc08a4d39d6389 840w, https://mintcdn.com/ezyiah-3f16b61b/mEqdHLyQPbZI3Zxy/images/annotated/banks/lbf-bank-confirm-1.png?w=1100\u0026fit=max\u0026auto=format\u0026n=mEqdHLyQPbZI3Zxy\u0026q=85\u0026s=b6c1b602ebf2bc3de1f877ea716d0c9c 1100w, https://mintcdn.com/ezyiah-3f16b61b/mEqdHLyQPbZI3Zxy/images/annotated/banks/lbf-bank-confirm-1.png?w=1650\u0026fit=max\u0026auto=format\u0026n=mEqdHLyQPbZI3Zxy\u0026q=85\u0026s=08b8a73782ef197fac8308628b1d46a6 1650w, https://mintcdn.com/ezyiah-3f16b61b/mEqdHLyQPbZI3Zxy/images/annotated/banks/lbf-bank-confirm-1.png?w=2500\u0026fit=max\u0026auto=format\u0026n=mEqdHLyQPbZI3Zxy\u0026q=85\u0026s=62a2e43b4f0859f88a01cf18af19044d 2500w`})}),_jsxs(_components.p,{children:[`They check what’s shared and click `,_jsx(_components.strong,{children:`Confirm and share`}),`.`]})]}),_jsxs(Step,{title:`Access Approved`,children:[_jsx(Frame,{caption:`Step 6: Access Approved`,children:_jsx(OptimizedImage,{src:`https://mintcdn.com/ezyiah-3f16b61b/mEqdHLyQPbZI3Zxy/images/annotated/banks/lbf-approved-1.png?fit=max\u0026auto=format\u0026n=mEqdHLyQPbZI3Zxy\u0026q=85\u0026s=5d1c1b1d14c2253daceb5dc26c477c5b`,alt:`The Access Approved page showing Bank connected to Accountant with a green tick`,\"data-og-width\":`881`,width:`881`,\"data-og-height\":`394`,height:`394`,\"data-path\":`images/annotated/banks/lbf-approved-1.png`,\"data-optimize\":`true`,\"data-opv\":`3`,srcset:`https://mintcdn.com/ezyiah-3f16b61b/mEqdHLyQPbZI3Zxy/images/annotated/banks/lbf-approved-1.png?w=280\u0026fit=max\u0026auto=format\u0026n=mEqdHLyQPbZI3Zxy\u0026q=85\u0026s=8ebee4086a2c2901924a11928026e983 280w, https://mintcdn.com/ezyiah-3f16b61b/mEqdHLyQPbZI3Zxy/images/annotated/banks/lbf-approved-1.png?w=560\u0026fit=max\u0026auto=format\u0026n=mEqdHLyQPbZI3Zxy\u0026q=85\u0026s=66ddd53717992a4c4016a9b54c2c3004 560w, https://mintcdn.com/ezyiah-3f16b61b/mEqdHLyQPbZI3Zxy/images/annotated/banks/lbf-approved-1.png?w=840\u0026fit=max\u0026auto=format\u0026n=mEqdHLyQPbZI3Zxy\u0026q=85\u0026s=48666afe1955279eb1f5b48882eb5cef 840w, https://mintcdn.com/ezyiah-3f16b61b/mEqdHLyQPbZI3Zxy/images/annotated/banks/lbf-approved-1.png?w=1100\u0026fit=max\u0026auto=format\u0026n=mEqdHLyQPbZI3Zxy\u0026q=85\u0026s=bf0526d506877b08ff1568335dfef017 1100w, https://mintcdn.com/ezyiah-3f16b61b/mEqdHLyQPbZI3Zxy/images/annotated/banks/lbf-approved-1.png?w=1650\u0026fit=max\u0026auto=format\u0026n=mEqdHLyQPbZI3Zxy\u0026q=85\u0026s=d27fa5fdc6219b35fe432aea1f59f0a1 1650w, https://mintcdn.com/ezyiah-3f16b61b/mEqdHLyQPbZI3Zxy/images/annotated/banks/lbf-approved-1.png?w=2500\u0026fit=max\u0026auto=format\u0026n=mEqdHLyQPbZI3Zxy\u0026q=85\u0026s=f6eb6a80eb28bc14a8a6725ed0852710 2500w`})}),_jsxs(_components.p,{children:[`Ezyiah shows `,_jsx(_components.strong,{children:`Access Approved`}),`. They can close the page. The feed now shows as `,_jsx(_components.strong,{children:`Live`}),` on your client’s `,_jsx(_components.strong,{children:`Banks`}),` page.`]})]})]}),`\n`,_jsx(Heading,{level:`2`,id:`bring-in-older-transactions`,children:`Bring in older transactions`}),`\n`,_jsx(_components.p,{children:`A new feed starts from today. To bring in history:`}),`\n`,_jsxs(Steps,{children:[_jsx(Step,{title:`Open the account`,children:_jsxs(_components.p,{children:[`In `,_jsx(_components.strong,{children:`Banks`}),`, click the account card. The account’s page opens, with its transactions.`]})}),_jsxs(Step,{title:`Click Fetch Previous Data`,children:[_jsx(Frame,{caption:`Step 2: Fetch Previous Data is in the top right of the account's page`,children:_jsx(OptimizedImage,{src:`https://mintcdn.com/ezyiah-3f16b61b/mEqdHLyQPbZI3Zxy/images/annotated/banks/lbf-fetch-1.png?fit=max\u0026auto=format\u0026n=mEqdHLyQPbZI3Zxy\u0026q=85\u0026s=7bfbac1d32ac72650751aa9afb31b9a3`,alt:`A bank account's page with a callout on the Fetch Previous Data button, plus the Ezyiah and bank balances and Total Transactions`,\"data-og-width\":`1920`,width:`1920`,\"data-og-height\":`1072`,height:`1072`,\"data-path\":`images/annotated/banks/lbf-fetch-1.png`,\"data-optimize\":`true`,\"data-opv\":`3`,srcset:`https://mintcdn.com/ezyiah-3f16b61b/mEqdHLyQPbZI3Zxy/images/annotated/banks/lbf-fetch-1.png?w=280\u0026fit=max\u0026auto=format\u0026n=mEqdHLyQPbZI3Zxy\u0026q=85\u0026s=e24d72b1ed7e1e38e70c7cfe463a1981 280w, https://mintcdn.com/ezyiah-3f16b61b/mEqdHLyQPbZI3Zxy/images/annotated/banks/lbf-fetch-1.png?w=560\u0026fit=max\u0026auto=format\u0026n=mEqdHLyQPbZI3Zxy\u0026q=85\u0026s=367f17a113a38779ebf72b8b56401852 560w, https://mintcdn.com/ezyiah-3f16b61b/mEqdHLyQPbZI3Zxy/images/annotated/banks/lbf-fetch-1.png?w=840\u0026fit=max\u0026auto=format\u0026n=mEqdHLyQPbZI3Zxy\u0026q=85\u0026s=4c7da560feda43bb75e3ed4856aa1446 840w, https://mintcdn.com/ezyiah-3f16b61b/mEqdHLyQPbZI3Zxy/images/annotated/banks/lbf-fetch-1.png?w=1100\u0026fit=max\u0026auto=format\u0026n=mEqdHLyQPbZI3Zxy\u0026q=85\u0026s=4b65b48113ab9ec2b22f614410b2ae21 1100w, https://mintcdn.com/ezyiah-3f16b61b/mEqdHLyQPbZI3Zxy/images/annotated/banks/lbf-fetch-1.png?w=1650\u0026fit=max\u0026auto=format\u0026n=mEqdHLyQPbZI3Zxy\u0026q=85\u0026s=ada4b2b741a50f1bec55844e8dcdaa5b 1650w, https://mintcdn.com/ezyiah-3f16b61b/mEqdHLyQPbZI3Zxy/images/annotated/banks/lbf-fetch-1.png?w=2500\u0026fit=max\u0026auto=format\u0026n=mEqdHLyQPbZI3Zxy\u0026q=85\u0026s=8839654b5025f834e2d0519f919ddf79 2500w`})}),_jsxs(_components.p,{children:[`It’s in the top right. The `,_jsx(_components.strong,{children:`Fetch Previous Data`}),` window opens.`]})]}),_jsxs(Step,{title:`Pick how far back`,children:[_jsx(Frame,{caption:`Step 3: pick how far back, then click Fetch`,children:_jsx(OptimizedImage,{src:`https://mintcdn.com/ezyiah-3f16b61b/mEqdHLyQPbZI3Zxy/images/annotated/banks/lbf-fetch-2.png?fit=max\u0026auto=format\u0026n=mEqdHLyQPbZI3Zxy\u0026q=85\u0026s=cf3a81a6450b96b71ae16717b8655d1b`,alt:`The Fetch Previous Data window with callouts on the Select Period dropdown, set to Live Forward (from today), and Fetch`,\"data-og-width\":`1219`,width:`1219`,\"data-og-height\":`375`,height:`375`,\"data-path\":`images/annotated/banks/lbf-fetch-2.png`,\"data-optimize\":`true`,\"data-opv\":`3`,srcset:`https://mintcdn.com/ezyiah-3f16b61b/mEqdHLyQPbZI3Zxy/images/annotated/banks/lbf-fetch-2.png?w=280\u0026fit=max\u0026auto=format\u0026n=mEqdHLyQPbZI3Zxy\u0026q=85\u0026s=ae53a30934d7a90ef4682b55891fabd2 280w, https://mintcdn.com/ezyiah-3f16b61b/mEqdHLyQPbZI3Zxy/images/annotated/banks/lbf-fetch-2.png?w=560\u0026fit=max\u0026auto=format\u0026n=mEqdHLyQPbZI3Zxy\u0026q=85\u0026s=b1480b4797bcbfd57332fa49c13f14e9 560w, https://mintcdn.com/ezyiah-3f16b61b/mEqdHLyQPbZI3Zxy/images/annotated/banks/lbf-fetch-2.png?w=840\u0026fit=max\u0026auto=format\u0026n=mEqdHLyQPbZI3Zxy\u0026q=85\u0026s=96772533d3c719c176ee7d0a64ff3e91 840w, https://mintcdn.com/ezyiah-3f16b61b/mEqdHLyQPbZI3Zxy/images/annotated/banks/lbf-fetch-2.png?w=1100\u0026fit=max\u0026auto=format\u0026n=mEqdHLyQPbZI3Zxy\u0026q=85\u0026s=4b850ad8c3b8987572fc7a5fd672859a 1100w, https://mintcdn.com/ezyiah-3f16b61b/mEqdHLyQPbZI3Zxy/images/annotated/banks/lbf-fetch-2.png?w=1650\u0026fit=max\u0026auto=format\u0026n=mEqdHLyQPbZI3Zxy\u0026q=85\u0026s=73f0b1c11ed7d3815f159dc6fec78ba7 1650w, https://mintcdn.com/ezyiah-3f16b61b/mEqdHLyQPbZI3Zxy/images/annotated/banks/lbf-fetch-2.png?w=2500\u0026fit=max\u0026auto=format\u0026n=mEqdHLyQPbZI3Zxy\u0026q=85\u0026s=05eda4a8722ce76410fb4757cb7dd7e8 2500w`})}),_jsxs(_components.p,{children:[`Open `,_jsx(_components.strong,{children:`Select Period`}),`. It starts on `,_jsx(_components.strong,{children:`Live Forward (from today)`}),`. Choose `,_jsx(_components.strong,{children:`1 month back`}),`, `,_jsx(_components.strong,{children:`3 months back`}),`, `,_jsx(_components.strong,{children:`6 months back`}),`, `,_jsx(_components.strong,{children:`12 months back`}),`, `,_jsx(_components.strong,{children:`24 months back`}),` or `,_jsx(_components.strong,{children:`Custom Date`}),`. Then click `,_jsx(_components.strong,{children:`Fetch`}),`.`]})]}),_jsx(Step,{title:`Let it run`,children:_jsxs(_components.p,{children:[`Ezyiah brings in the transactions and starts reconciling. Watch it happen in the `,_jsx(_components.a,{href:`/get-started/ezyiah-assistant`,children:`Ezyiah Assistant`}),`.`]})})]}),`\n`,_jsx(Tip,{children:_jsx(_components.p,{children:`Fetched history counts toward your transactions. Fetch only as far back as you need.`})}),`\n`,_jsx(Heading,{level:`2`,id:`what-happens-next`,children:`What happens next`}),`\n`,_jsxs(_components.p,{children:[`Ezyiah reconciles each new transaction and works out the GST. Anything it isn’t sure about is flagged for you to check. Review the work in the `,_jsx(_components.a,{href:`/features/chart-of-accounts/reviewing-your-chart-of-accounts`,children:`Chart of Accounts`}),`.`]})]})}function MDXContent(props={}){const{wrapper:MDXLayout}={..._provideComponents(),...props.components};return MDXLayout?_jsx(MDXLayout,{...props,children:_jsx(_createMdxContent,{...props})}):_createMdxContent(props)}return{default:MDXContent};function _missingMdxReference(id,component){throw new Error(`Expected `+(component?`component`:`object`)+\" `\"+id+\"` to be defined: you likely forgot to import, pass, or provide it.\")}","frontmatter":{},"scope":{"config":{},"pageMetadata":{"title":"Live bank feeds","description":"Connect a client's bank so transactions come in every day","href":"/features/banks/adding-live-bank-feeds"}}},"mdxSourceWithNoJs":null},"mdxExtracts":{"tableOfContents":[{"title":"Connect a bank feed","slug":"connect-a-bank-feed","depth":2,"children":[]},{"title":"What the account holder sees","slug":"what-the-account-holder-sees","depth":2,"children":[]},{"title":"Bring in older transactions","slug":"bring-in-older-transactions","depth":2,"children":[]},{"title":"What happens next","slug":"what-happens-next","depth":2,"children":[]}],"codeExamples":{}},"jsLinks":[],"subdomain":"ezyiah-3f16b61b","siteName":"Ezyiah","title":"Live bank feeds - Ezyiah","navMaps":{"firstHrefInVersion":{},"firstHrefInLanguage":{}},"lastModified":"2026-11-01T08:50:34.370Z","originalFileLocation":"features/banks/adding-live-bank-feeds.mdx"},"headHtml":"\u003cscript data-mint-head>(function(){var d=document.documentElement,p=null;if(!p){try{p=localStorage.getItem(\"isDarkMode\")}catch(e){}if(p==='true')p='dark';else if(p==='false')p='light';if(p!=='light'\u0026\u0026p!=='dark'\u0026\u0026p!=='system')p=\"light\"}var r=p==='system'?(matchMedia(\"(prefers-color-scheme: dark)\").matches?'dark':'light'):p;d.classList.remove(r==='dark'?'light':'dark');d.classList.add(r);d.setAttribute(\"data-theme-preference\",p)})();\u003c/script>\u003cmeta data-mint-head name=\"description\" content=\"Connect a client\u0026#x27;s bank so transactions come in every day\">\u003cmeta data-mint-head name=\"application-name\" content=\"Ezyiah\">\u003cmeta data-mint-head name=\"generator\" content=\"Mintlify\">\u003clink data-mint-head rel=\"icon\" type=\"image/png\" sizes=\"192x192\" href=\"/mintlify-assets/_mintlify/favicons/ezyiah-3f16b61b/EtmDKKQMcC9s0pB0/_generated/favicon/android-chrome-192x192.png\" media=\"(prefers-color-scheme: light)\">\u003clink data-mint-head rel=\"apple-touch-icon\" type=\"image/png\" sizes=\"180x180\" href=\"/mintlify-assets/_mintlify/favicons/ezyiah-3f16b61b/EtmDKKQMcC9s0pB0/_generated/favicon/apple-touch-icon.png\">\u003clink data-mint-head rel=\"icon\" type=\"image/png\" sizes=\"16x16\" href=\"/mintlify-assets/_mintlify/favicons/ezyiah-3f16b61b/EtmDKKQMcC9s0pB0/_generated/favicon/favicon-16x16.png\" media=\"(prefers-color-scheme: light)\">\u003clink data-mint-head rel=\"icon\" type=\"image/png\" sizes=\"32x32\" href=\"/mintlify-assets/_mintlify/favicons/ezyiah-3f16b61b/EtmDKKQMcC9s0pB0/_generated/favicon/favicon-32x32.png\" media=\"(prefers-color-scheme: light)\">\u003clink data-mint-head rel=\"shortcut icon\" type=\"image/x-icon\" href=\"/mintlify-assets/_mintlify/favicons/ezyiah-3f16b61b/EtmDKKQMcC9s0pB0/_generated/favicon/favicon.ico\" media=\"(prefers-color-scheme: light)\">\u003clink data-mint-head rel=\"icon\" type=\"image/png\" sizes=\"192x192\" href=\"/mintlify-assets/_mintlify/favicons/ezyiah-3f16b61b/EtmDKKQMcC9s0pB0/_generated/favicon-dark/android-chrome-192x192.png\" media=\"(prefers-color-scheme: dark)\">\u003clink data-mint-head rel=\"icon\" type=\"image/png\" sizes=\"16x16\" href=\"/mintlify-assets/_mintlify/favicons/ezyiah-3f16b61b/EtmDKKQMcC9s0pB0/_generated/favicon-dark/favicon-16x16.png\" media=\"(prefers-color-scheme: dark)\">\u003clink data-mint-head rel=\"icon\" type=\"image/png\" sizes=\"32x32\" href=\"/mintlify-assets/_mintlify/favicons/ezyiah-3f16b61b/EtmDKKQMcC9s0pB0/_generated/favicon-dark/favicon-32x32.png\" media=\"(prefers-color-scheme: dark)\">\u003clink data-mint-head rel=\"shortcut icon\" type=\"image/x-icon\" href=\"/mintlify-assets/_mintlify/favicons/ezyiah-3f16b61b/EtmDKKQMcC9s0pB0/_generated/favicon-dark/favicon.ico\" media=\"(prefers-color-scheme: dark)\">\u003cmeta data-mint-head property=\"og:title\" content=\"Live bank feeds - Ezyiah\">\u003cmeta data-mint-head property=\"og:description\" content=\"Connect a client\u0026#x27;s bank so transactions come in every day\">\u003cmeta data-mint-head property=\"og:site_name\" content=\"Ezyiah\">\u003cmeta data-mint-head property=\"og:url\" content=\"https://help.ezyiah.com.au/features/banks/adding-live-bank-feeds\">\u003cmeta data-mint-head property=\"og:type\" content=\"website\">\u003cmeta data-mint-head property=\"og:image\" content=\"https://ezyiah-3f16b61b.mintlify.site/_mintlify/api/og/v2?division=Banks\u0026amp;title=Live+bank+feeds\u0026amp;description=Connect+a+client%27s+bank+so+transactions+come+in+every+day\u0026amp;theme=1974a0ab219212bc3df95941\u0026amp;signature=e9650319662ee1e1eb241b66f456fd84ada2ce6c3fb840d4eb06ea9c28c5a0e7\">\u003cmeta data-mint-head property=\"og:image:width\" content=\"1200\">\u003cmeta data-mint-head property=\"og:image:height\" content=\"630\">\u003cmeta data-mint-head name=\"twitter:card\" content=\"summary_large_image\">\u003cmeta data-mint-head name=\"twitter:title\" content=\"Live bank feeds - Ezyiah\">\u003cmeta data-mint-head name=\"twitter:description\" content=\"Connect a client\u0026#x27;s bank so transactions come in every day\">\u003cmeta data-mint-head name=\"twitter:image\" content=\"https://ezyiah-3f16b61b.mintlify.site/_mintlify/api/og/v2?division=Banks\u0026amp;title=Live+bank+feeds\u0026amp;description=Connect+a+client%27s+bank+so+transactions+come+in+every+day\u0026amp;theme=1974a0ab219212bc3df95941\u0026amp;signature=e9650319662ee1e1eb241b66f456fd84ada2ce6c3fb840d4eb06ea9c28c5a0e7\">\u003cmeta data-mint-head name=\"twitter:image:width\" content=\"1200\">\u003cmeta data-mint-head name=\"twitter:image:height\" content=\"630\">\u003cmeta data-mint-head name=\"msapplication-config\" content=\"/mintlify-assets/_mintlify/favicons/ezyiah-3f16b61b/EtmDKKQMcC9s0pB0/_generated/favicon/browserconfig.xml\">\u003cmeta data-mint-head name=\"apple-mobile-web-app-title\" content=\"Ezyiah\">\u003cmeta data-mint-head name=\"msapplication-TileColor\" content=\"#2547F9\">\u003clink data-mint-head rel=\"canonical\" href=\"https://help.ezyiah.com.au/features/banks/adding-live-bank-feeds\">\u003clink data-mint-head rel=\"alternate\" type=\"application/xml\" href=\"/sitemap.xml\">\u003clink data-mint-head rel=\"alternate\" type=\"text/markdown\" href=\"/features/banks/adding-live-bank-feeds.md\">\u003cscript data-mint-head type=\"application/ld+json\">{\"@context\":\"https://schema.org\",\"@graph\":[{\"@type\":\"Organization\",\"@id\":\"https://help.ezyiah.com.au/#organization\",\"name\":\"Ezyiah\",\"url\":\"https://help.ezyiah.com.au\",\"logo\":{\"@type\":\"ImageObject\",\"url\":\"https://mintcdn.com/ezyiah-3f16b61b/Ve47CujuGgN4pyqd/images/light.svg?fit=max\u0026auto=format\u0026n=Ve47CujuGgN4pyqd\u0026q=85\u0026s=a93f09364beedb00d71c1ee4b10f4954\"}},{\"@type\":\"WebSite\",\"@id\":\"https://help.ezyiah.com.au#website\",\"name\":\"Ezyiah\",\"url\":\"https://help.ezyiah.com.au\",\"publisher\":{\"@id\":\"https://help.ezyiah.com.au/#organization\"}},{\"@type\":\"WebPage\",\"@id\":\"https://help.ezyiah.com.au/features/banks/adding-live-bank-feeds#webpage\",\"url\":\"https://help.ezyiah.com.au/features/banks/adding-live-bank-feeds\",\"name\":\"Live bank feeds\",\"description\":\"Connect a client's bank so transactions come in every day\",\"dateModified\":\"2026-11-01T08:50:34.370Z\",\"isPartOf\":{\"@id\":\"https://help.ezyiah.com.au#website\"},\"breadcrumb\":{\"@id\":\"https://help.ezyiah.com.au/features/banks/adding-live-bank-feeds#breadcrumb\"}},{\"@type\":\"BreadcrumbList\",\"@id\":\"https://help.ezyiah.com.au/features/banks/adding-live-bank-feeds#breadcrumb\",\"itemListElement\":[{\"@type\":\"ListItem\",\"position\":1,\"name\":\"Banks\",\"item\":\"https://help.ezyiah.com.au/features/banks/overview\"},{\"@type\":\"ListItem\",\"position\":2,\"name\":\"Live bank feeds\",\"item\":\"https://help.ezyiah.com.au/features/banks/adding-live-bank-feeds\"}]},{\"@type\":[\"Article\",\"TechArticle\"],\"@id\":\"https://help.ezyiah.com.au/features/banks/adding-live-bank-feeds#article\",\"headline\":\"Live bank feeds\",\"name\":\"Live bank feeds\",\"description\":\"Connect a client's bank so transactions come in every day\",\"url\":\"https://help.ezyiah.com.au/features/banks/adding-live-bank-feeds\",\"mainEntityOfPage\":{\"@id\":\"https://help.ezyiah.com.au/features/banks/adding-live-bank-feeds#webpage\"},\"dateModified\":\"2026-11-01T08:50:34.370Z\",\"publisher\":{\"@id\":\"https://help.ezyiah.com.au/#organization\"},\"isPartOf\":{\"@id\":\"https://help.ezyiah.com.au#website\"}}]}\u003c/script>\u003cscript data-mint-head type=\"application/ld+json\">{\"@context\":\"https://schema.org\",\"@type\":\"WebSite\",\"name\":\"Ezyiah\",\"publisher\":{\"@type\":\"Organization\",\"name\":\"Ezyiah\"},\"provider\":{\"@type\":\"Organization\",\"name\":\"Mintlify\",\"url\":\"https://mintlify.com\"}}\u003c/script>","agentPointerHref":"/features/banks/adding-live-bank-feeds.md","siteName":"Ezyiah","nav":{"global":null,"tabs":[{"tab":"Get Started","pages":[{"title":"Get Started","href":""}]},{"tab":"Accountants","pages":[{"title":"Accountants","href":"/accountants/getting-started/ezyiah-for-accounting-firms"}]},{"tab":"Businesses","pages":[{"title":"Businesses","href":"/businesses/getting-started/ezyiah-for-business-owners"}]},{"tab":"Banks \u0026 Reports","groups":[{"group":"Banks","pages":[{"title":"Banks overview","description":"The ways to get bank transactions into Ezyiah","href":"/features/banks/overview"},{"title":"Live bank feeds","href":"/features/banks/adding-live-bank-feeds"},{"title":"Managing bank feeds","description":"Disconnect or delete a bank account, or set it as Cash at Bank","href":"/features/banks/managing-live-bank-feeds"},{"title":"Manual bank accounts","href":"/features/banks/adding-a-manual-bank-account"},{"title":"Catching up on old transactions","href":"/features/banks/catching-up-on-old-transactions"},{"title":"Connect business bank accounts","href":"/features/banks/setting-up-live-bank-feeds-for-business-accounts"}]},{"group":"Setting up the ledger","pages":[{"title":"Choosing the business entity","href":"/features/ledger-setup/business-entity-selection"},{"title":"Opening balances","href":"/features/ledger-setup/adding-opening-balances"},{"title":"Loans","href":"/features/ledger-setup/adding-a-loan"}]},{"group":"Chart of Accounts","pages":[{"title":"Checking the Chart of Accounts","href":"/features/chart-of-accounts/reviewing-your-chart-of-accounts"},{"title":"Managing transactions","href":"/features/chart-of-accounts/transaction-management"},{"title":"Adding a manual journal","href":"/features/chart-of-accounts/adding-manual-transactions"},{"title":"Custom accounts","href":"/features/chart-of-accounts/creating-custom-chart-of-accounts"}]},{"group":"Depreciation","pages":[{"title":"Adding an asset","href":"/features/depreciation/adding-an-asset"},{"title":"Depreciation Schedule report","href":"/features/depreciation/preparing-your-depreciation-schedule"}]},{"group":"TPAR","pages":[{"title":"TPAR overview","href":"/features/tpar/overview"},{"title":"Auto Sync Subcontractors","href":"/features/tpar/auto-sync-subcontractors"},{"title":"Assigning payments to subcontractors","href":"/features/tpar/auto-allocate-subcontractors"},{"title":"TPAR report","href":"/features/tpar/preparing-your-taxable-payments-annual-report"}]},{"group":"Reports","pages":[{"title":"Reports overview","href":"/features/reports/overview"},{"title":"BAS report","href":"/features/reports/bas"},{"title":"Profit \u0026 Loss report","href":"/features/reports/profit-and-loss"},{"title":"Balance Sheet report","href":"/features/reports/balance-sheet"},{"title":"Trial Balance report","href":"/features/reports/trial-balance"},{"title":"General Ledger report","href":"/features/reports/general-ledger"},{"title":"Transaction Report","href":"/features/reports/transactions"},{"title":"Aged Receivables and Aged Payables","href":"/features/reports/aged-receivables-and-payables"},{"title":"EOFY Statement","href":"/features/reports/eofy"}]}]},{"tab":"Billing","pages":[{"title":"Billing","href":"/features/billing/managing-your-subscription"}]}]},"basePath":"","title":"Live bank feeds - Ezyiah","deploymentId":"dpl_DyXGnKeCjZyA3sUdfMJ7FjkdBefg","buildId":"dpl_DyXGnKeCjZyA3sUdfMJ7FjkdBefg","dynamics":["07c022d89b","a74be98ba7"],"chunks":["Frame-D0FT0qQs.js","DynamicMarkdown-CQM9Bhbv.js","zoom-image-lightbox-BQ4tbj_9.js","lightbox-handle-r17bVUz3.js"]}